Awarded Top 4 Education Facility in Australia by the MAGAP (Asia Pacific)


A clean fade depends less on swapping guards and more on controlling each transition. This barber clipper fading guide explains how deliberate blending, steady clipper movement and small adjustments can soften harsh lines and create a balanced finish.
If you’re unsure which guard to start with, how far to move the taper lever or why a visible weight line keeps appearing, a repeatable sequence can make fading easier to learn. Work through one transition at a time, and assess the result before making another pass.
You’ll learn how guards and the taper lever affect cutting length, how to work between sections, and how clipper angle and pressure influence the blend. You’ll also find practical ways to diagnose lines, patches and uneven sides. Focused, hands-on practice helps you build control and make more deliberate adjustments.
A fade is a gradual transition from shorter hair to longer hair, without an abrupt band of darker hair interrupting the blend. The effect comes from managing the changes in length across the sides and back so each section connects naturally to the next. A clean result isn’t simply the shortest possible cut. It’s a deliberate balance of lengths that works with the shape of the head.
A clean fade has even transitions and controlled contrast, so shorter and longer sections flow together without a harsh weight line.
Low, mid and high describe where the transition begins, not a different blending method. A low fade starts close to the hairline near the ears and nape. A mid fade begins around the middle of the sides, while a high fade starts further up, closer to the upper sides of the head. A skin fade reaches bare skin at its shortest point. Other fades retain a short layer of hair instead of cutting down to skin.
Use the head as your map. The lower area sits just above the sideburns and around the bottom of the back hairline. The middle runs around the sides near the temples and upper ear. The upper area is closer to the parietal ridge, where the sides begin to curve towards the top.
These landmarks help you plan, but they won’t look identical on every head. A strong growth pattern, a cowlick or a change in head shape can make the same transition look darker or more prominent in one spot. Check the hair from several angles, and blend into the chosen top length rather than aiming for a fixed endpoint.
A dark band often appears when neighbouring sections have too large a jump in cutting length. The shorter area ends abruptly, leaving a noticeable edge where the longer hair begins. An uneven starting guideline can make that difference more obvious on one side or around a curve of the head.
Clipper control matters, too. A change in angle or uneven pressure can remove more hair in one patch and leave extra weight beside it. Rather than making another broad pass, identify the exact line or patch, then use small, controlled movements around that transition. Pause and check the result before adjusting further.
For a practical check, use even lighting and turn the head slightly to view the blend from the front, side and back. A line that disappears from one angle may still catch the light from another. Compare where each transition begins and how it follows the head’s contours. Aim for visual balance rather than forcing every detail to match perfectly.
This is the foundation of a reliable barber clipper fading guide: understand the shape you’re working with, keep transitions gradual and make adjustments with purpose. With practice, you’ll get better at spotting where the blend needs attention before reaching for the clippers again.
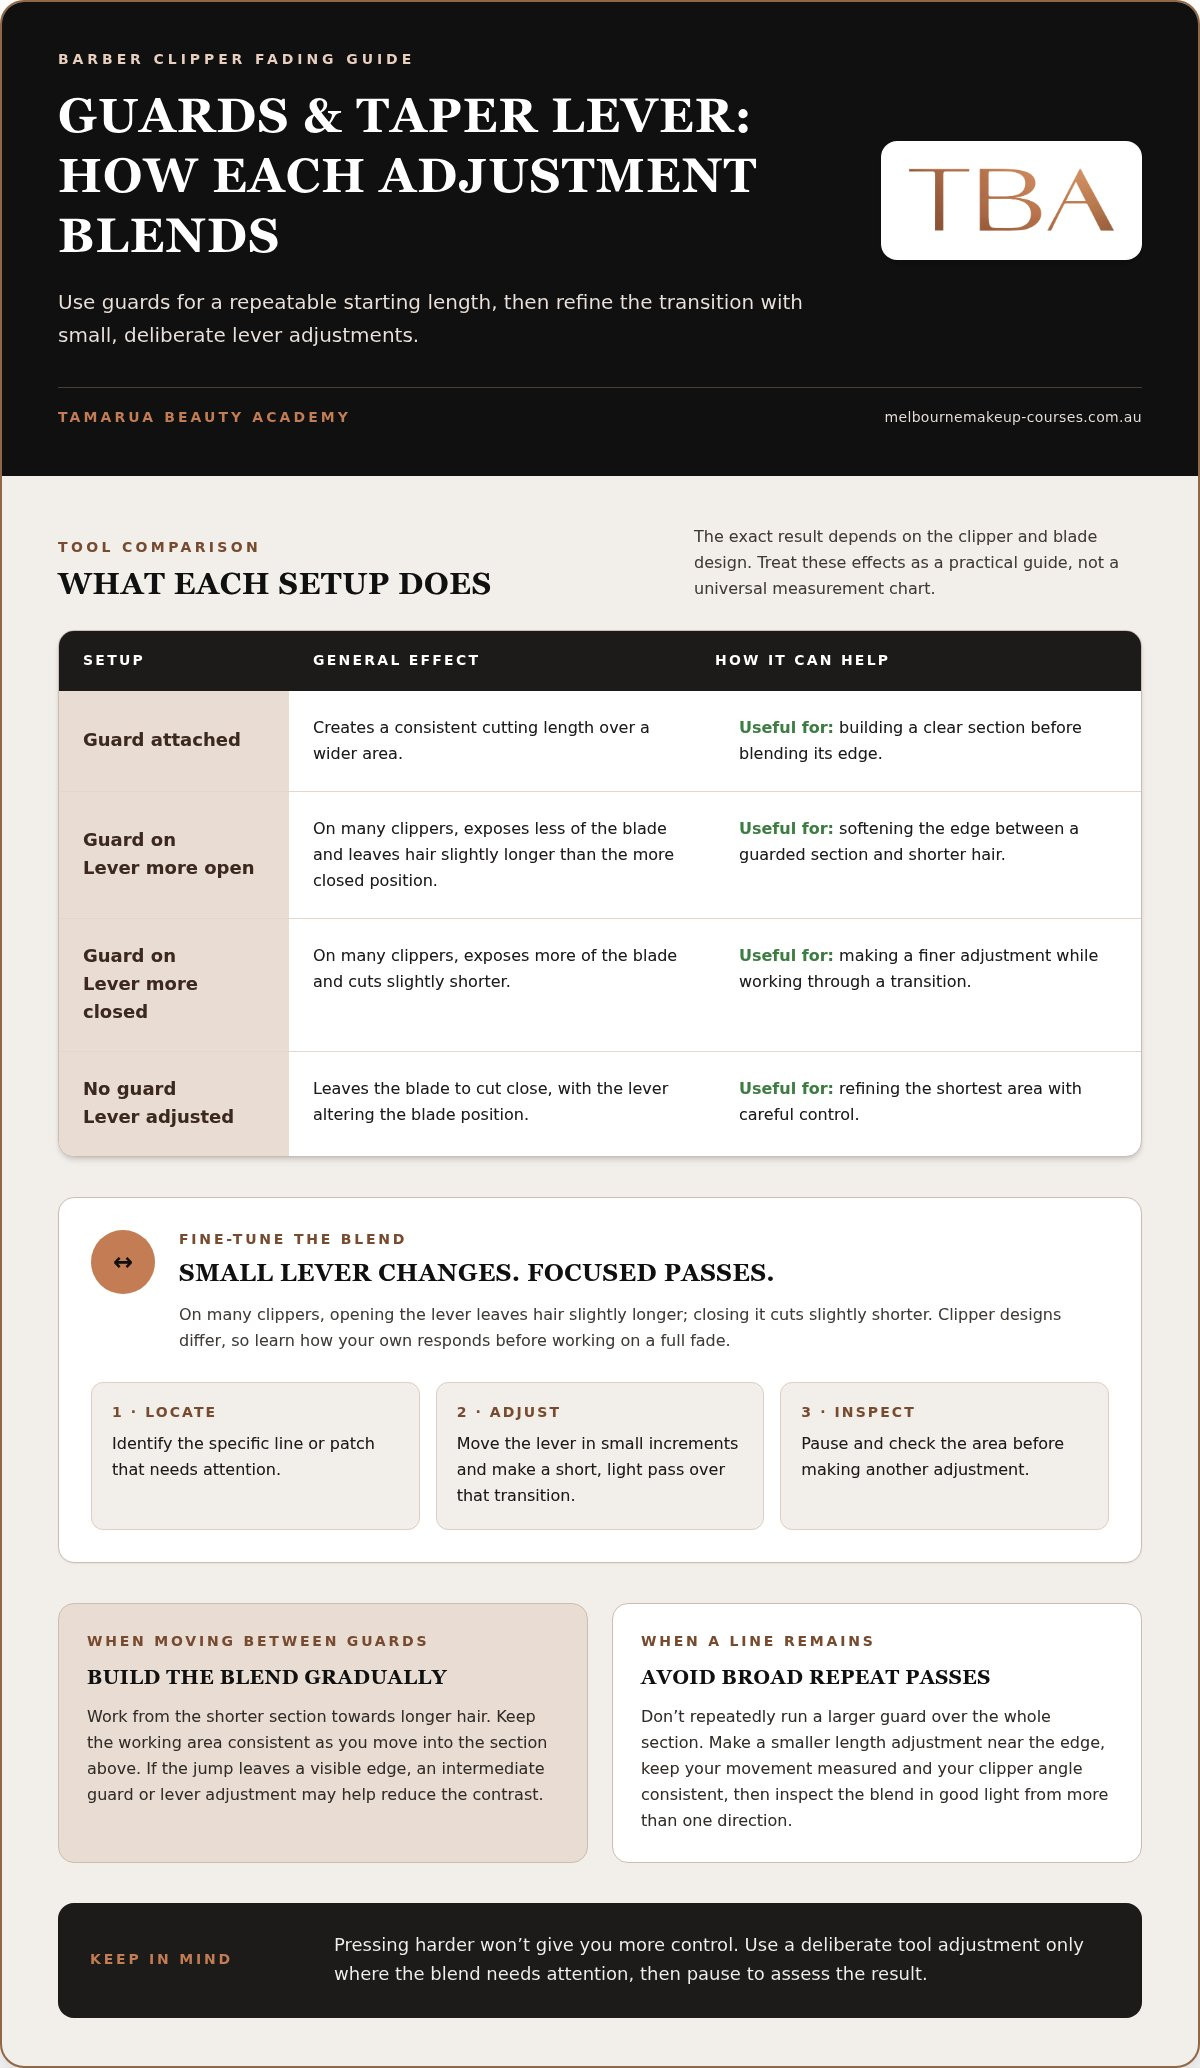
Guards and the taper lever give you two ways to manage cutting length. A guard attaches over the blade to create a repeatable starting length, while the lever shifts the blade position to make a smaller adjustment. Used together, they help you move gradually between sections instead of jumping from very short hair to a much longer length.
Think of a guard as setting the broader step, then use the lever to refine the transition around it. The exact result depends on the clipper and blade design, so use the positions below as a practical guide, not a universal measurement chart.
| Setup | General effect | How it can help |
|---|---|---|
| Guard attached | Creates a consistent cutting length over a wider area. | Builds a clear section before you blend its edge. |
| Guard attached, lever more open | On many clippers, exposes less of the blade and leaves hair slightly longer than the more closed position. | Can soften the edge between a guarded section and shorter hair. |
| Guard attached, lever more closed | On many clippers, exposes more of the blade and cuts slightly shorter. | Offers a finer adjustment when working through a transition. |
| No guard, lever adjusted | Leaves the blade to cut close, with the lever altering the blade position. | Can refine the shortest area, with careful control. |
Work in a controlled progression from the shorter section towards longer hair. After establishing one length, use the next suitable guard to move into the section above it, keeping your working area consistent. If the jump between two lengths leaves a visible edge, an intermediate guard or a lever adjustment may help reduce the contrast. Guard numbering and actual cutting lengths vary between clipper systems. For detailed guard-number explanations, refer to the dedicated clipper guard sizes reference; this section focuses on using the tools to blend.
On many clippers, an open lever leaves the blade in a position that cuts slightly longer, while closing it moves the blade towards a closer cut. Designs differ, so learn how your clipper responds before working on a full fade. Move the lever in small increments, make a short, light pass over the specific transition, then pause and inspect the area. Pressing harder won't give you more control over the blend.
Small changes matter. If a guard-to-guard transition looks too abrupt, avoid repeatedly running the larger guard over the whole section. Instead, make a smaller length adjustment near the edge, keeping your movement measured and clipper angle consistent. Check the hair in good light from more than one direction to see whether the line is softening or simply shifting.
This is a core principle in any barber clipper fading guide: know which tool adjustment you're making and apply it only where the blend needs attention. For guided skill development and practical demonstrations, explore Tamarua Beauty Academy's barbering course.
A smooth fade is easier to build when you plan the shape first, establish a clear guideline, then work through the lengths in order. Keep sections consistent and check your progress as you go. This gives you a repeatable process instead of leaving you to guess once a line appears.
Before switching on the clippers, settle on the fade height and shape, then map where the first line will sit. Keep the clipper movement steady as you create the guideline, and resist pushing it higher just to make it look sharper. Once it’s in place, check the line from the front, sides and back. An all-round view can reveal an uneven curve before you build the next section.
Work through your planned lengths one stage at a time, using short, light passes where sections meet. Flick the clipper out at the transition rather than driving it straight up, which can create a fresh line. After each pass, stop and look for the remaining dark area. This focused approach keeps the blend controlled and helps you avoid cutting more hair than the specific spot needs.
Controlled, overlapping passes help create an even transition because they soften small gaps between sections without removing too much hair in one spot. Practical demonstrations and structured learning can help you put this sequence into practice. Explore Tamara Beauty Academy’s barbering course as a next step in your barber clipper fading guide journey.
When a fade looks off, resist the urge to run the clippers over the whole area again. First identify what you can see and where the transition changes. A dark band, a pale patch and sides that don’t match can have different causes. Diagnosing the issue helps you correct it without taking away more length than necessary.
Diagnose the remaining weight before changing the cutting length. Check the area in consistent lighting, then view it from more than one angle. This helps you distinguish a true line from a shadow caused by the head’s curve or the direction of hair growth.
Find the exact edge causing the band, then choose a small adjustment with the taper lever or an intermediate guard if it suits the transition. Use short, light, flicking passes across the line, lifting the clipper away rather than cutting the entire section again. Pause between passes and check the result in the same lighting from the front, side and back.
Compare corresponding points on each side rather than judging one side in isolation. For example, compare one temple with the same landmark on the other side. Before correcting a patch, look at the hair’s growth direction. Strands that lie differently can create a dark or light spot without needing more cutting. Make a minimal adjustment, then reassess the whole shape.
Keep the fade height in mind as you troubleshoot. Repeatedly cutting higher to chase a stubborn line can raise the transition and remove length you meant to keep. If a correction isn’t improving the blend, stop, brush the hair into its natural position and inspect the area again. A short pause can make the cause easier to see.
Use a steady routine: identify the problem, locate the specific transition, make one controlled correction and check the result before continuing. In a barber clipper fading guide, careful observation is just as valuable as clipper control. Build your technique with structured practice through Tamara Beauty Academy’s barbering course.
Confidence grows through deliberate repetition, not by trying to perfect a complete fade straight away. Start by practising one transition, such as blending a shorter section into the length above it. This lets you focus on clipper angle, pressure and lever control without juggling every part of the haircut at once.
Use a mannequin or practise with appropriate supervision, especially while learning how your clippers respond. Repeat the same sectioning and blending order each time. A consistent routine makes it easier to notice progress because you’re refining the technique rather than improvising a new approach on every attempt.
Choose one transition to work on, then practise the same guard changes and lever movements in the same section. Take a before photo and an after photo from consistent angles and in similar lighting. Compare line placement, symmetry and any areas that still look uneven. Choose one skill to focus on in your next session, such as keeping the guideline level or making lighter passes.
Keep brief notes alongside your photos. Record which section you practised, what adjustment helped and where a line remained. Over time, these notes help you track progress and return to a specific challenge. Don’t rush to attempt a full fade. Expand your practice as individual transitions become more controlled.
Feedback adds another perspective. Someone watching may notice an imbalance or an inconsistent movement that’s hard to spot while you’re concentrating on the clippers. Turn that feedback into a practical next step: choose one adjustment, repeat the movement, then review the result. Each focused session helps build steadier technique and a stronger feel for the craft.
Demonstrations and hands-on instruction help you see clipper movements in practice and refine your own control with guidance. Tamara Beauty Academy offers barbering training in Melbourne, with on-site and live-online courses. Whether you’re in Melbourne city, Victoria’s Eastern suburbs or Western suburbs, Brimbank, Hobsons Bay, Maribyrnong, Melton or Wyndham, explore the barbering course training to develop your skills beyond this barber clipper fading guide.
Keep practising with patience. Small improvements in one transition can make the whole process feel more manageable, and regular review helps turn useful feedback into stronger skills. If you’re ready to develop your barbering technique through structured learning, explore barbering course options.
Every fade you practise is a chance to sharpen your judgement as well as your clipper movement. Notice how the hair responds, reflect on your decisions and take one useful lesson into your next practice session. That steady approach can turn an uncertain technique into a more confident part of your craft.
This barber clipper fading guide gives you a foundation to build on. Founded in 2010, Tamara Beauty Academy offers a barbering course with practical demonstrations for aspiring barbers who want to develop their skills through structured training.
Explore Tamara Beauty Academy’s barbering course options and take a considered next step in developing your barbering skills. Keep practising, stay open to feedback and build your technique one blend at a time.
Blend a fade by connecting neighbouring lengths in small, deliberate stages. Start with the shape you’ve planned, then work through the transitions without trying to remove every dark area at once. Use the clipper’s corner for small spots where needed, and move your wrist outwards at the edge of each pass. In this barber clipper fading guide, the key is to assess the hair between passes instead of cutting on autopilot.
Choose your starting guard based on the shortest length you intend to leave, the client’s preference and the clipper system you’re using. There isn’t one starting guard that suits every fade. If you’re unsure, begin with a longer setting. You can always take away more hair, but you can’t put length back. Check the result on a small area before continuing, particularly if the hair is dense or grows unevenly.
To soften a line, first identify which two sections meet at the edge. Then make a small adjustment near the boundary rather than cutting broadly above or below it. Brush the hair into its natural direction before checking again, as loose cut hairs can make the line harder to read. Use good, even lighting and turn the head slightly. A line that looks faint straight on may stand out from the side.
The taper lever adjusts the blade position, giving you a way to fine-tune the cut without changing the guard. On many clippers, moving it towards open leaves hair slightly longer, while closing it cuts closer. The amount of change varies by clipper, so get familiar with the lever before working on a fade. Try each position on a small area and note how it changes the result.
Yes, beginners can practise fading at home, but a mannequin or supervised practice gives you room to learn without rushing a complete haircut. Start with a single transition and use a mirror arrangement that lets you see the back as well as the sides. If you’re in Melbourne or elsewhere in Victoria, Tamara Beauty Academy’s barbering course offers structured training to help you develop your skills.
A patchy appearance can come from uneven clipper pressure, a change in hair growth direction or lighting that makes one area look darker. Brush the hair down, then inspect the spot from another angle before deciding to cut more. If it still looks uneven, compare it with the matching area on the other side. Make a small correction only when you can see a clear difference in length.
Neither position is right for every pass. An open lever generally leaves more length, which can help when you’re beginning a transition. A closed lever generally cuts closer and may suit a finer adjustment. Clipper designs differ, so test how yours responds rather than relying on the position alone. Adjust in small increments, especially near the hairline, where an overly close pass can be difficult to soften.