Awarded Top 4 Education Facility in Australia by the MAGAP (Asia Pacific)


A cleaner blend depends less on knowing every technique and more on controlling each transition. Strong barber cutting techniques combine clear sectioning, considered tool choices and steady checks, helping you shape a cut without leaving harsh lines or removing more length than intended.
Learning technique names is one thing; choosing the right method while you cut is another. An uneven blend can change the whole result, but accuracy comes from a repeatable process rather than guesswork. Start with the shape you want, assess how the hair behaves and make each adjustment for a specific reason.
This guide explains what core techniques achieve, how to match them to hair and style, and how to build a controlled workflow from consultation to finishing. We’ll cover clipper work, scissor cutting, sectioning and blending, then look at ways to practise with purpose. Whether you’re building your foundations or refining your craft, a clear process helps you work with greater control and confidence.
A haircut is more than a sequence of movements with clippers or scissors. Barber cutting techniques are ways to shape, blend and finish hair, each serving a different purpose. One method can reduce bulk, another can create a gradual transition between lengths, while finishing work refines the surface and outline.
Choose a cutting method to suit the shape you want, then use it to remove, retain or refine hair with control. Before picking up a tool, picture the finished silhouette. Is the outline close and neat, softly graduated, or longer with movement? This helps you decide where to remove weight and where to preserve length.
For short, blended sides with a longer top, use clippers to reduce length around the sides, then blend the transition so it doesn’t look like a hard step. A longer, scissor-shaped cut calls for a different emphasis. Scissors can preserve movement and create a softer outline without taking the sides down as close.
Compare a classic short back and sides with a longer shape that sits around the ears. The first needs a clean, compact outline; the second may need weight retained around the sides to support its shape. These methods can work together in one haircut: clipper work, scissor-over-comb and detailing each contribute to a different part of the silhouette.
Before focusing on speed, establish a steady posture, relaxed hand control and even tension on the hair. Section consistently so you can see what you’re cutting and compare one area with the next. If you’re starting out, smaller, visible sections make it easier to spot uneven lengths early and adjust before they affect the overall shape.
Pause to check the cut from the front, sides and back. A shape that looks balanced from one angle may reveal excess weight or an uneven outline from another. These repeatable checks turn barber cutting techniques into deliberate choices rather than rushed movements.
Three goals help clarify what a method is designed to do:
Keep these goals in mind as you plan. The right technique supports the intended outline while leaving room to refine the result. Posture, sectioning and considered method choices all contribute to a balanced cut.
Each tool gives you a different kind of control. Clippers remove length efficiently and establish close shapes. Scissors preserve more length and allow nuanced shaping. Blending connects areas cut to different lengths, while detailing refines edges and smaller areas once the main shape is in place. These methods work best together.
Blending connects different hair lengths through progressive changes, helping one area flow into the next. The goal isn’t simply to erase a visible line. It’s to create a transition that suits the haircut, the hair’s density and the outline you’re building. Assess the whole shape instead of repeatedly cutting at one stubborn mark.
Use clippers with a steady, deliberate movement and consistent contact against the head, adjusting your approach as the surface curves. Guard selection affects the length left behind, so choose with the desired shape in mind rather than relying on one formula for every fade. Focus on controlling the area you’re working through and checking how it connects to the next length.
As you move between lengths, lightly overlapping the working areas can help soften a transition. Check the blend from different angles, and avoid making repeated passes without a clear reason. For general professional context, the American Barber Association industry standards offers a reference point for exploring the wider barbering field.
Scissor-over-comb is useful for refining shorter areas and connecting them to longer hair. The comb lifts and presents the hair; the scissors trim what extends beyond it. This lets you shape a transition without relying only on clippers. Work progressively, since the amount removed depends on how much hair you expose, then reassess the outline as you go.
Point cutting serves a different purpose. Directing the scissor points into selected ends can soften a blunt edge or introduce texture without removing length uniformly across the section. Use it selectively: too much texturising can disturb the outline or make the finish look uneven. Practise hand positioning and scissor-over-comb as distinct skills before combining them at speed.
Detailing brings precision to the final shape. It may involve refining the perimeter or tidying small areas, but it shouldn’t become a reason to keep cutting without checking the overall result. Step back, compare both sides and consider how the top connects to the sides. Make a small adjustment only when it addresses a specific issue.
To strengthen these barber cutting techniques, decide on the purpose of each pass: reduce length, soften a transition, refine the shape or add texture. In guided, hands-on barbering study, demonstrations help make those choices easier to see and repeat. Explore the barbering course options to build confident control with clippers and scissors.
The same haircut plan can behave differently on different heads of hair. Start with the requested shape, then adapt your method to density, texture and natural growth direction. The aim isn’t to force every client into one template. Choose barber cutting techniques that support the look while responding to how the hair actually behaves.
For short, structured sides, clipper-led work can establish the outline and create a gradual transition. Scissor-led cutting suits softer shapes where you want to preserve length and movement. Selective point cutting can refine the surface after the main form is established. It can soften or add detail, but it won’t replace the structural work that gives the haircut its shape.
| Cut goal | Useful approach | Consider |
|---|---|---|
| Short, blended shape | Clipper work with blending between lengths | Where the outline sits and how the sides connect to the top |
| Longer, softer shape | Scissor-led shaping, including scissor-over-comb where suitable | Which areas need length retained to support the silhouette |
| Texture-focused finish | Selective point cutting or other careful texturising | How much movement is wanted without disturbing the outline |
Use the table as a starting point, not a fixed prescription. One cut may combine approaches: clippers can shape one area while scissors retain length elsewhere, with finishing work bringing the surface into balance.
Density affects how much weight a section carries, while growth direction influences how it lies once released. A dense area may need selective weight removal to sit comfortably within the intended shape. If hair grows close to the head, removing too much can expose a change in the outline. Assess how the section falls before cutting further.
Curls can spring up as they dry, so account for their natural movement rather than judging length only while stretched. A cowlick may lift or push hair in a direction that changes the finish. Uneven growth can also make matching both sides less straightforward. Adjust your section size, tension and amount removed to suit the area, then check how the hair settles.
Keep reassessing as you work. Comb the hair into its natural direction, compare the shape from more than one angle and make measured adjustments rather than following a rigid template. This helps preserve the intended outline while tailoring the technique to the individual head of hair.
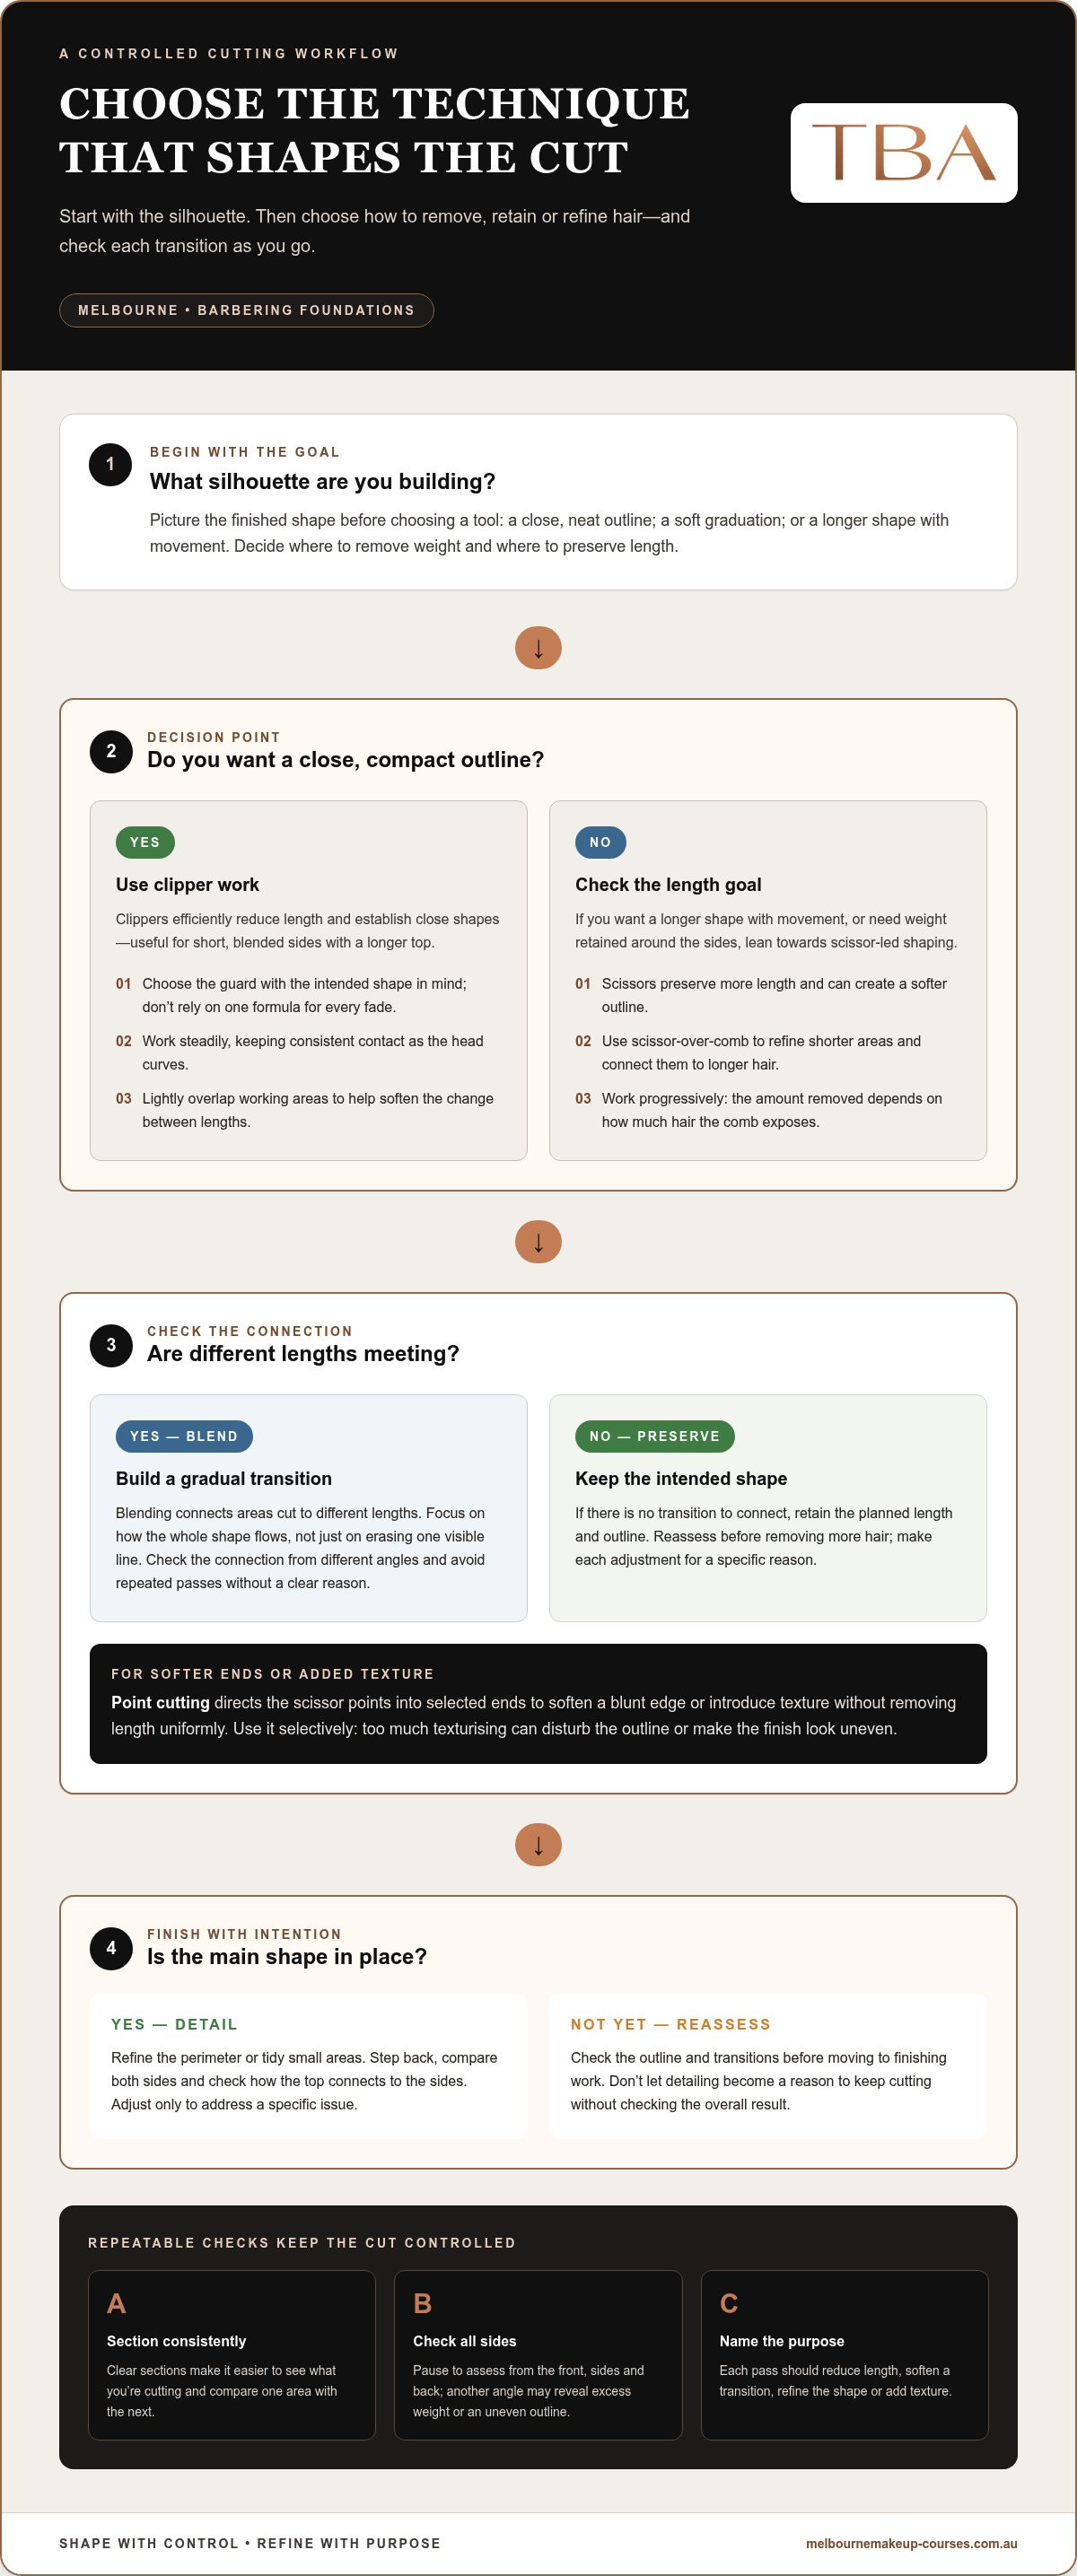
A repeatable workflow gives each decision a place, from the first conversation to the final check. Plan the shape, establish it, blend with purpose, then review the whole cut. Adapt the tools and amount removed to the requested result rather than following a rigid formula.
Begin by clarifying the requested length, outline and finish. A client’s description may leave room for interpretation, so agree on the overall shape before cutting. Organise the hair into sections that keep the working area visible and make weight easier to compare from one side to the other. Build the outline gradually, checking the developing shape before moving on.
Build in pauses, especially after establishing the outline and blending. Check whether the weight distribution, transition and overall balance support the agreed shape. Detailing belongs near the end: use it to refine the result, not to compensate for an outline or blend that needs more considered work. A calm final review helps identify where a small adjustment will improve the cut.
Guided demonstrations and hands-on practice can help turn barber cutting techniques into more confident decisions. Explore the barbering course options and develop your skills through structured learning.
Confidence comes from purposeful repetition and useful feedback, not from rushing to complete more cuts. Treat each practice session as a chance to understand how your movements affect the result, then use what you notice to guide your next attempt. This steady approach helps turn barber cutting techniques into skills you can apply with control.
Choose a clear focus for each session, such as making sections more consistent, controlling the comb during scissor-over-comb or improving a transition. Repeat the movement deliberately before increasing speed or adding complexity. Focusing on one skill makes it easier to recognise what’s working and where a small adjustment could help.
After each practice cut, review it from several angles and note what you observe. Record whether the sections were even, whether the blend looked smooth and whether the overall shape felt balanced. Choose one improvement to carry into your next session. Specific notes keep practice focused and make progress easier to recognise.
Keep your review constructive. Identify the area that needs attention, then decide what to practise next. Avoid extra passes without a clear purpose; each adjustment should help you understand and improve the result.
Practical demonstrations let you observe the sequence, tool control and decision-making behind a technique. Hands-on instruction gives you the opportunity to practise those movements and develop practical confidence through experience.
Tamarua Beauty Academy offers a barbering course with practical demonstrations and hands-on instruction. Industry certification is awarded upon course completion. Structured learning can support your progress as you strengthen foundational skills and apply them with increasing assurance.
Choose a skill, practise it with care and carry what you learn into your next session. If you’re ready to continue developing your craft, explore barbering course options.
Every cut is a chance to strengthen your judgement and make more deliberate choices. As you practise barber cutting techniques, focus on skills you can adapt to different hair and client goals. Patience and curiosity help your craft develop with every opportunity to learn.
Based in Melbourne, Tamara Beauty Academy offers a barbering course with practical demonstrations and hands-on instruction. For aspiring barbers in Melbourne city and across Victoria, including the eastern and western suburbs, Brimbank, Hobsons Bay, Maribyrnong, Melton and Wyndham, structured learning offers a practical way to build your skills. Industry certification is awarded upon course completion.
Explore Tamara Beauty Academy’s barbering course and take your next step. Keep practising, stay open to new ideas and build your skills with focused instruction.
Yes. Beginners can develop barber cutting techniques without previous experience by learning tool handling and foundational shapes before attempting complex cuts. Start on a mannequin to practise comb control and steady scissor movement. Whether you’re beginning in Melbourne city, the eastern or western suburbs, Brimbank, Hobsons Bay, Maribyrnong, Melton or Wyndham, a regular practice routine helps you build familiarity at your own pace.
A fade usually blends hair progressively from very short at the lower edge into greater length higher up the sides or back. A taper typically changes length more locally, often around the temples and neckline, while leaving more of the surrounding hair untouched. Barbers may use these terms differently, so agree on the intended placement and overall look before cutting.
Barbers create a smoother blend by making small, controlled adjustments and checking how each area connects before removing more hair. Good lighting can make faint dark patches and uneven transitions easier to spot. If a line remains, identify whether it comes from a length difference or the hair’s direction, then adjust only the area that needs attention instead of cutting higher across the whole section.
Yes. Adapt the approach to the curl pattern and the way the hair forms naturally. Check how the curls sit before cutting, and avoid repeatedly stretching or combing them straight if that changes their shape. A conservative first adjustment lets you see how the curls settle; you can then refine the outline while preserving the client’s preferred volume and movement.
Scissors are useful when the cut calls for more control over longer hair, varied lengths or a softer edge, such as shaping around the top without taking it down uniformly. Clippers can be more efficient for close, consistent length across larger areas. The choice isn’t always either-or: a barber may use both tools on different parts of one haircut to achieve the requested result.
Begin with a mannequin and keep your tools clean, organised and within easy reach. Practise opening and closing scissors with control, keeping your fingers clear of the blades and maintaining a stable working position. Before working on another person, build confidence with basic movements and communicate clearly about what you’re practising. Take breaks if your hand or wrist starts to feel tired, as fatigue can affect control.
Start with safe tool handling, comb control and an understanding of how head shape affects the outline. Practise creating tidy sections and maintaining consistent tension before moving on to detailed fades or complex texture work. Learn to observe how hair lies at the crown, around the ears and at the neckline, since these areas can change how a finished shape appears. Build one skill at a time.