Awarded Top 4 Education Facility in Australia by the MAGAP (Asia Pacific)


A confident skin assessment begins with asking useful questions, not reaching straight for a treatment plan. During a client consultation, it can be tempting to read more into a visible concern than the evidence supports. Reliable skin analysis techniques pair a thoughtful conversation with careful observation, helping you separate what you can see from what you can’t safely assume.
A consistent approach makes assessments clearer and more client-centred. This guide walks you through a practical sequence for discussing a client’s concerns, observing their skin, recording findings in plain language and considering suitable next steps. You’ll also learn when sensitivity or another concern calls for pausing and recommending professional advice, rather than making a diagnosis.
Whether you’re developing consultation skills or refining your facial practice, structured learning and hands-on experience can help you build sound professional judgement. Use this repeatable framework as a starting point, adapting it to each client with care, confidence and respect for your scope of practice.
Skin analysis is a systematic way to discuss and observe a client’s skin, including its visible features and the client’s preferences. Using skin analysis techniques means listening to their experience, looking carefully and recording what you can actually observe. This can help you discuss suitable skincare or facial options instead of relying on a one-size-fits-all routine or a single feature, such as shine or dryness.
Visible oiliness in one area, for example, doesn’t tell you the whole story. Your client might also report tightness after cleansing, sensitivity to a product or a recent change in their routine. Combining their feedback with what you see gives you a more individual starting point for discussing appropriate care. Remember that an assessment is a snapshot, not a permanent label. Products, environment, recent treatments and other changes can affect how skin appears on the day.
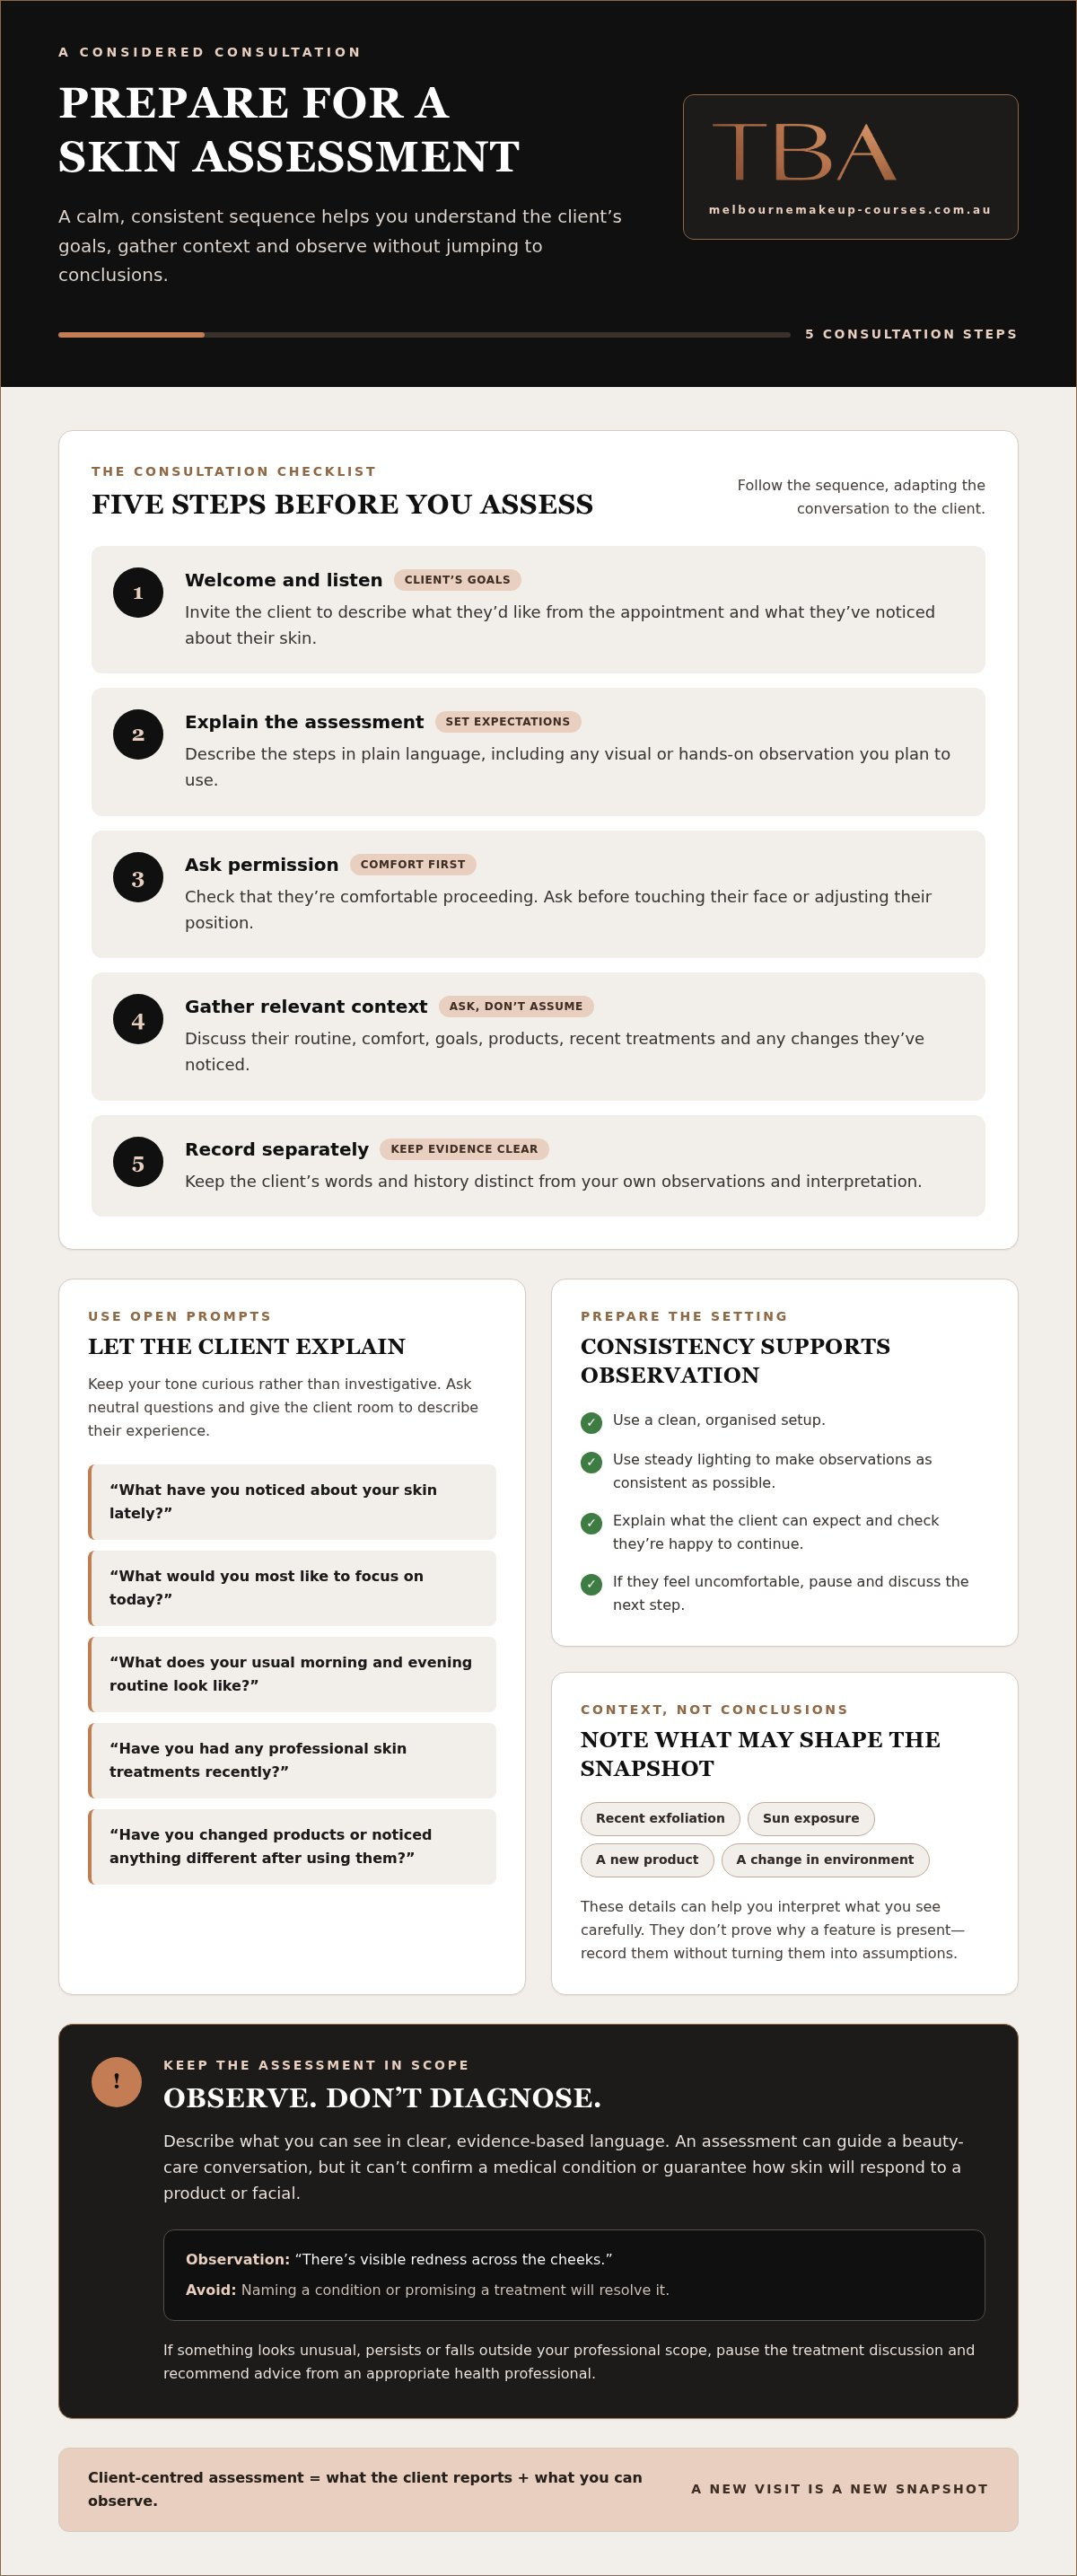
Use precise language. “There’s visible redness across the cheeks” describes an observation; “this is rosacea” makes a diagnosis. An assessment can inform a beauty-care conversation, but it can’t confirm a medical condition or guarantee how skin will respond to a product or facial.
Your role is to observe, ask relevant questions and record findings, not diagnose disease. Skin can show a wide range of changes. A general overview of skin conditions illustrates why visible signs alone shouldn’t be treated as a diagnosis. Avoid naming a condition or promising that a treatment will resolve it.
If something looks unusual, persists or falls outside your professional scope, pause the treatment discussion and recommend that the client seek advice from an appropriate health professional. This measured response keeps the client’s wellbeing in focus and your practice within what you’re trained to assess.
A consistent method helps you avoid rushed assumptions based on one visible feature. Ask what the client has noticed, compare their account with what you observe, then explain your findings in plain language. This gives them a chance to correct or add context, making the conversation collaborative rather than prescriptive.
Skin analysis is an observation-led, client-centred assessment. It uses what a client reports and what you can see to guide appropriate beauty care, not to diagnose a medical condition.
Clear notes also make recommendations easier to discuss. You can link a suggestion to an observed feature or stated goal while being transparent about uncertainty. If the skin looks different at a later visit, treat that as a new snapshot and reassess rather than assuming the earlier picture still applies.
A thoughtful consultation starts before you examine the skin. A calm welcome and a clear explanation help your client understand what you’ll do and share useful context without feeling hurried or judged. Follow a consistent sequence, while allowing the conversation to respond to the person in front of you.
Open questions give clients room to explain their experience in their own words. Try prompts such as “What have you noticed about your skin lately?” or “What would you most like to focus on today?” Then ask what products they use, how often they use them and how their skin feels afterwards. Keep the tone curious rather than investigative.
Ask about recent exfoliation, treatments or product changes to understand the context, not to assign a cause. Avoid leading questions such as “That product made you red, didn’t it?” Instead, let the client explain what happened and when. Don’t promise a particular result based on their answers; use the information to guide a careful discussion.
Before you begin, explain what the client can expect and check they’re still happy to continue. Use a clean, organised setup and steady lighting to make your observations as consistent as possible. If the client feels uncomfortable at any point, pause and discuss the next step rather than pressing on.
Ask about factors that may shape what you see on the day, such as recent exfoliation, sun exposure, a new product or a change in environment. These details don’t prove why a feature is present, but they can help you interpret the snapshot carefully. Record them clearly instead of turning them into assumptions.
In your notes, distinguish the client’s account from your assessment. For example, write “client reports tightness after cleansing” separately from “visible flaking around the nose”. This makes your reasoning easier to explain and review. Practising a consistent consultation alongside hands-on facial training can help you develop both your assessment process and your client communication.
Combine observation methods to build a fuller picture rather than letting one tool or feature shape your entire assessment. Visual checks show what’s apparent in the current light; gentle touch can add information about how the surface feels; magnification can make some details easier to see. Used thoughtfully, these skin analysis techniques support careful observation, not diagnosis.
Method | Purpose | Limitations
Visual observation | Notice visible texture, shine, dryness, redness and uneven tone across the face. | Lighting, recent products and temporary changes can affect appearance; observation alone doesn’t explain a cause.
Tactile observation | With permission, gently assess how the skin’s surface feels, such as whether an area feels smooth or rough. | Touch is subjective and should be gentle, hygienic and suitable for the client. It can’t confirm a condition.
Magnification or imaging | Make selected surface details easier to view; specialist imaging may also create visual records or reports. | A closer view or report still needs context and professional interpretation. It doesn’t replace discussion with the client.
Work methodically so you compare areas instead of focusing on the first feature you notice. Under consistent lighting, scan the forehead, nose, cheeks, chin and jawline. Note visible texture, shine or dryness, redness and areas of uneven appearance. Describe what’s present without guessing at the reason.
If touch is appropriate, explain what you’ll do and gain the client’s consent first. Use clean hands and a light, gentle approach, stopping if the client feels uncomfortable. Record the sensation in plain language, such as “surface feels rough on the chin”, rather than turning a tactile impression into a diagnosis.
Magnification can help you view surface details more closely when the lighting and positioning are suitable. It may add detail to a manual assessment, but a magnified view can’t tell you how the client experiences their skin or why a feature is present. Relate what you see to the client’s feedback and the conditions of the assessment.
Specialist imaging differs from a hands-on examination. It can provide visual records and reports for discussion, while manual assessment relies on direct observation and, where suitable, gentle touch. Neither approach should be treated as a stand-alone answer. Tools can add detail, but context and client discussion guide interpretation.
Keep your notes specific and balanced. For instance, record “visible shine across the forehead” rather than labelling the client’s entire skin type from that one area. Consistent comparisons, respectful touch and considered use of magnification make your observations more useful while keeping conclusions within the limits of what you can assess.
Once you’ve gathered information, bring it together without blurring the difference between what the client reports, what you observe and what you infer. Skin analysis techniques are most useful when findings lead to a considered conversation, not a quick label. A client might report tightness after cleansing while you observe visible flaking around the nose. Record each point distinctly, then discuss whether a suitable beauty-care option fits their goals and your training.
Keep the next step proportionate to the evidence. One observation doesn’t explain its cause, and a recommendation shouldn’t promise a particular result. Consider the client’s priorities alongside the features you’ve observed, and explain why a suggestion may be relevant. If information is limited or uncertain, say so. Ask follow-up questions, adapt your approach or hold off on recommending a treatment.
Use everyday descriptions rather than labels that could sound alarming or definitive. “You’ve mentioned tightness after cleansing, and I can see some flaking around the nose” is clearer and more accurate than naming a skin type or condition from limited evidence. Check that your summary reflects the client’s experience: “Have I understood what you’ve noticed?” Their response may add context or correct an assumption.
Make the record concise but useful. Include the client’s reported concern, your visible observations, relevant context and the next step you’ve discussed. Keep interpretation separate, and note uncertainty rather than presenting a possibility as fact. This gives you a clear basis for a collaborative recommendation and helps explain how it relates to the client’s goal.
If an assessment raises a concern that appears unusual, persistent or outside your competence, don’t proceed with a treatment that could be unsuitable. Explain calmly that you’re pausing because the concern needs advice beyond beauty care. Avoid trying to identify a medical condition; suggest the client seek guidance from an appropriate health professional.
Skin analysis guides beauty care, while diagnosis belongs to qualified health professionals. Respecting this boundary is part of sound professional judgement, not a failure to help. You can listen, document what the client reports and what you observe, and explain clearly why you’re not making a treatment recommendation.
Guided practice and feedback can help you develop this decision-making. Tamarua Beauty Academy’s facial course training includes practical demonstrations and hands-on instruction to support the development of careful assessment skills alongside facial practice.
Confidence grows through repetition, reflection and thoughtful feedback. Practise skin analysis techniques in a consistent sequence before trying to speed up or adapt the process. A simple routine helps you focus on the client, communicate clearly and make measured decisions rather than relying on memory or instinct alone.
During supervised practice, use the same consultation and observation checklist each time. After the assessment, review your notes and ask an educator or experienced supervisor for feedback on your technique and communication. Keep the focus on learning, not on getting every detail perfect at once.
Look for small improvements from one practice session to the next. Perhaps you noticed that “skin looks irritated” sounded like a conclusion, while “visible redness on the cheeks” was more precise. Or you realised you moved too quickly and needed to explain before using touch. Note what you’ll adjust next time, then practise again. This steady process helps make respectful language and careful observation part of your professional craft.
Guided, hands-on learning can help you connect assessment with the wider facial process, from preparing for a treatment to communicating clearly with a client. Tamara Beauty Academy’s facial course includes practical demonstrations and hands-on instruction, with industry certification upon completion. For learners developing foundational skills in Melbourne and across Victoria, including Melbourne city, the Eastern and western suburbs, Brimbank, Hobsons Bay, Maribyrnong, Melton and Wyndham, facial course training options can be a practical next step.
As you continue learning, return to the basics: listen closely, describe what you observe, explain your thinking and invite feedback. One-on-one training and supportive guidance can give you room to refine these habits and strengthen your confidence at your own pace. Each thoughtful practice session helps you build a more consistent approach, with the client’s comfort and individual needs at the centre.
Ready to build your practical facial skills? Explore facial course training at Tamara Beauty Academy and take your next step towards confident, client-centred work.
Let each consultation become an opportunity to sharpen your judgement. After a practice session, note one thing you communicated clearly and one detail you’d like to approach differently next time. This small habit can help make skin analysis techniques a thoughtful, repeatable part of your professional practice while keeping each client’s comfort and perspective in focus.
Learning doesn’t stop when you understand the steps. Keep asking for feedback, refining your language and building confidence through guided practice. Tamara Beauty Academy is a Melbourne beauty training institute supporting aspiring professionals as they develop their skills.
If you’re ready to strengthen your facial practice, explore facial course training. Take your next step towards greater confidence and considered practice in beauty.
Repeat the assessment when the client’s concerns, routine or treatment goals change, rather than relying indefinitely on an earlier record. If a client has started using different products or has a new care goal, revisit the discussion and observations before recommending a next step. A review at a later appointment can help you consider whether the original plan still suits them, without assuming one change caused another.
Yes, but makeup can hide visible shine, texture or redness, so explain that it may limit what you can assess. Ask whether the client is comfortable having makeup removed from the area you need to observe, and use appropriate hygiene practices. If removal isn’t suitable or the client prefers to keep it on, note this in your record and make clear that your observations are limited.
Weather and indoor conditions can influence how skin looks and feels on the day, but they don’t prove the cause of a feature. A client in Melbourne, for instance, may have been outdoors in the wind before entering a heated room. Ask what they’ve noticed, record relevant circumstances and treat your assessment as a snapshot. Avoid turning a temporary observation into a fixed skin label.
No. Skin analysis techniques used in beauty care can’t establish an allergy or confirm what caused a reaction. You can listen to the client’s account and record what they report, but don’t diagnose or try informal testing. If they describe a concerning reaction or are unsure what triggered it, recommend seeking advice from an appropriate health professional before proceeding with a treatment.
Don’t give a blanket instruction to stop products before an assessment. Ask what the client currently uses and whether anything has changed, then record that context. If they mention discomfort after using a product, don’t assume it caused the issue or advise them to change their routine based on that alone. Suggest they seek suitable professional advice before changing products or receiving a treatment.
No. Careful observation and clear notes can support a useful assessment without photographs. If you’re considering images, explain why you’d take them and get the client’s agreement before capturing or keeping them. For a later comparison, use consistent lighting and positioning so differences aren’t simply due to the setup. Treat photographs as a record to support discussion, not as a diagnosis or replacement for professional judgement.